A used shoe can look nearly unworn and still fall apart during its first walk. That is especially true of older footwear containing polyurethane foam, aging adhesives, synthetic linings, or brittle leather. Some deterioration happens internally long before obvious damage appears on the surface. Learning how to check for dry rot in used shoes therefore requires more than searching for visible cracks. You need to flex, press, twist, inspect, and understand exactly which material is beginning to fail.
The term “dry rot” is also used loosely in resale circles. True deterioration may involve aged leather, polyurethane hydrolysis, oxidized rubber, crumbling foam, adhesive failure, or fungal damage. Knowing the difference can keep a thrift-store bargain from becoming an expensive pile of fragments.
What People Mean by “Dry Rot” in Shoes
Shoes are composite products. A single pair may contain leather, rubber, polyurethane, EVA foam, textiles, adhesives, coatings, and synthetic reinforcement.
Those materials do not age in the same way.
Polyurethane is particularly important in older sneakers, hiking boots, work footwear, and some dress-shoe soles. Research cataloged by the Smithsonian Museum Conservation Institute shows that polyurethane ester foams can lose mechanical strength substantially as they deteriorate.
Scientists have also documented hydrolysis in polyurethane polymers, where reactions involving water break chemical bonds and gradually weaken the material. Research published by the American Chemical Society explains these hydrolytic degradation mechanisms in polyurethane systems.
That means shoes do not need to look wet or moldy to have a failing sole.
Leather presents different problems. It can become stiff, cracked, powdery, weakened, or damaged by inappropriate storage and treatments. The Smithsonian Museum Conservation Institute notes that leather deterioration is influenced by environmental factors including relative humidity and water absorption.
How to Check for Dry Rot in Used Shoes in Seven Steps
When I inspect secondhand footwear, I work from the outside inward. The goal is not to prove that a shoe is old. It is to determine whether its materials can still tolerate normal walking stresses.
1. Examine the Shoes Under Strong Light
Start without bending anything.
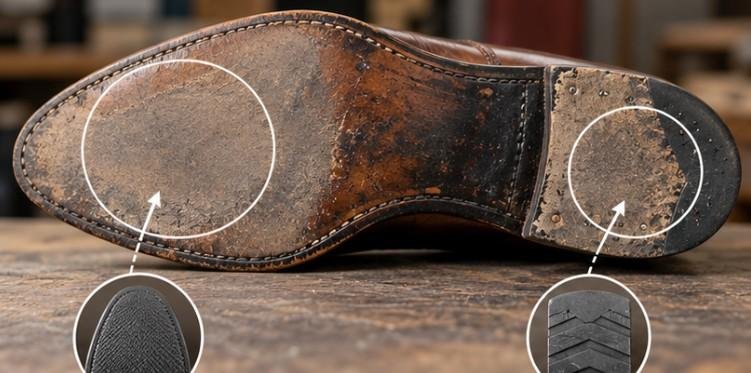
Inspect the toe, heel, sidewalls, welt area, midsole, outsole edges, and creases. Look for hairline cracking, unusual fading, peeling coatings, tiny surface fissures, separation, or areas that appear chalky.
Pay particular attention to the junction between different materials.
A gap developing between an upper and sole may indicate adhesive failure rather than deterioration throughout the sole. That distinction matters because localized delamination can sometimes be repaired.
Do not assume every white deposit means decay. National Park Service conservators explain that leather can develop fatty-acid “spew,” salt deposits, embedded dust, and other pale residues that may be mistaken for mold or deterioration.
2. Perform a Gentle Flex Test
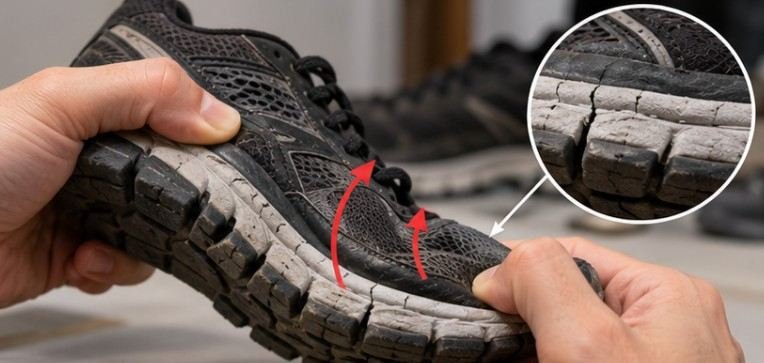
Hold the shoe securely and bend the forefoot where it would normally flex while walking.
Do this gradually rather than folding the shoe aggressively.
Watch the sidewall and sole closely. Healthy material should flex without suddenly cracking, flaking, or producing loose particles.
Stop immediately if a previously intact surface begins splitting.
An older shoe that survives sitting on a shelf may fail once mechanical stress is introduced. Flexing therefore reveals problems that photographs often hide.
3. Press the Midsole and Sole Edges
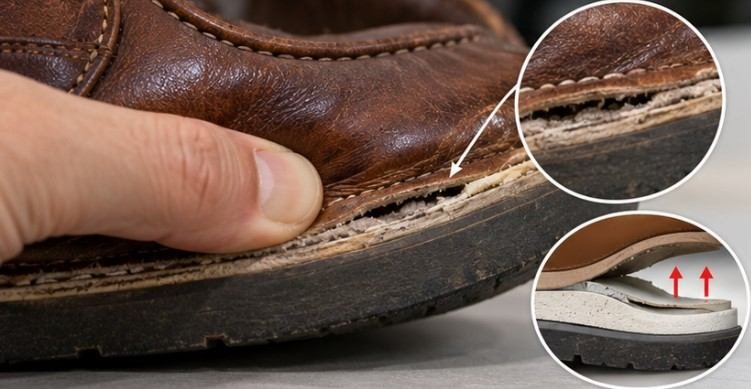
Use your thumb to press several areas of the sole and midsole. You are checking for consistent resistance. Material that feels unexpectedly brittle, unusually soft, permanently compressed, gummy, or granular deserves caution. Rub the area lightly afterward. Powder, small crumbs, or sandy particles indicate that the material may be losing structural integrity.
Do not dig your fingernail deeply into collectible or delicate footwear. The test should imitate ordinary handling rather than deliberately trying to destroy the shoe.
4. Try a Controlled Twist
Hold the heel in one hand and forefoot in the other, then apply a very slight opposing twist. A normal shoe should resist somewhat while remaining cohesive. Warning signs include sudden cracking, crumbling at the midsole, widening gaps between layers, or material breaking away around the heel.
This test is particularly useful on older sneakers and boots with thick synthetic midsoles.
5. Inspect the Glue Line
Look directly where the upper, midsole, and outsole meet.
A small amount of aged adhesive discoloration is not necessarily catastrophic. What matters more is whether the layers remain firmly attached.
Run a finger gently around the perimeter and look for lifted edges or widening gaps.
If the shoe otherwise feels structurally sound, isolated adhesive failure may be repairable. If the underlying foam itself crumbles when touched, simply applying new glue will not restore the degraded material.
6. Look Inside the Shoe
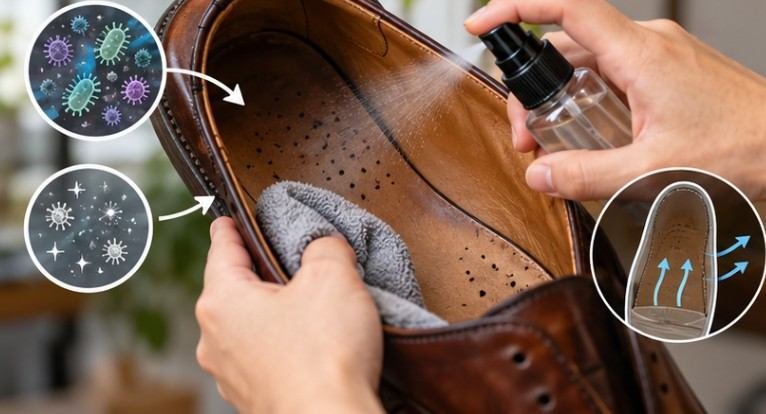
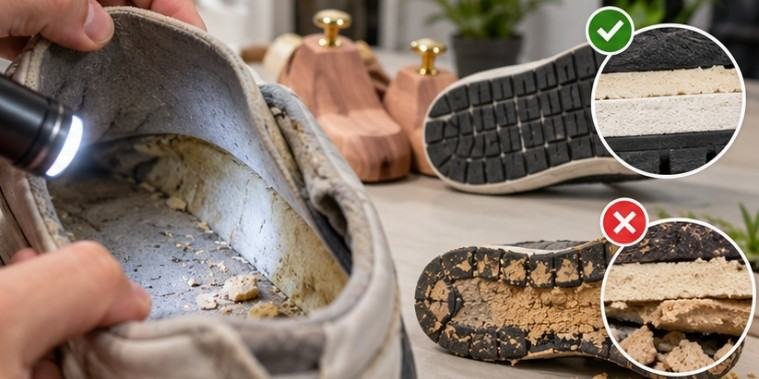
External condition can be misleading. Remove the insole if it is designed to come out. Use a flashlight to examine the footbed, heel lining, foam padding, tongue, and interior edges.
Watch for flaking synthetic lining, foam turning into crumbs, exposed backing fabric, sticky surfaces, or loose particles collecting beneath the insole. Interior deterioration can be particularly inconvenient because every step continues to grind weakened foam and lining materials.
7. Pay Attention to Odor
Smell cannot diagnose dry rot by itself, but unusual odors provide another clue. Strong mustiness can suggest prolonged damp storage or microbial activity. Sharp chemical or rancid odors can occur as materials, treatments, or contaminants age. Treat odor as supporting evidence rather than a pass-or-fail test.
Dry Rot, Old Glue, and Normal Leather Aging Are Not the Same
This distinction can save a good pair of shoes.
A detached outsole does not automatically mean the entire shoe is rotten. Adhesives can fail while surrounding materials remain usable. A cobbler may be able to clean and rebond the surfaces or replace a sole.
Likewise, superficial leather creasing does not equal structural failure. Older leather often develops microcracks and wear while remaining stable enough for continued use. National Park Service documentation of historic boots, for example, describes aged leather with microcracking that remained structurally sound.
Construction matters too. Shoes designed for repair may justify professional work where disposable construction does not. My guide to hand-welted bespoke shoes versus factory-made construction explains why repairability differs so dramatically between footwear types.
Fit should also be confirmed before paying for restoration. If you are considering secondhand monk straps, the double monk strap leather dress shoes sizing guide can help determine whether the pair is worth repairing in the first place.
Can Dry-Rotted Shoes Be Repaired?
Sometimes—but only when the problem has been misidentified. Old glue can often be replaced. Worn leather soles on well-constructed footwear can frequently be resoled. Certain linings and heel components can also be renewed.
A sole or midsole that is actively crumbling is different. Glue cannot restore a polymer whose structure is already breaking down.
Conditioning is not a universal cure either. National Park Service conservation research cautions that leather dressings do not reverse structural deterioration and that inappropriate treatments can contribute to staining, stickiness, embrittlement, and other problems.
If an expensive vintage pair is questionable, let a professional cobbler inspect it before purchase or use.
How to Store Used Shoes After Buying Them
Keep footwear somewhere reasonably cool, dry, clean, and ventilated rather than exposing it to major temperature and humidity swings. Allow worn shoes to dry naturally before storage. Avoid leaving damp footwear in enclosed containers for extended periods.
Cedar or unfinished wooden shoe trees can help leather footwear hold its shape and absorb some moisture after wear, but storage accessories cannot reverse materials that have already deteriorated.
National Park Service preservation guidance emphasizes regular inspection because deterioration can otherwise progress unnoticed. That principle applies just as well to a personal shoe collection.
Frequently Asked Questions
1. What does dry rot look like in used shoes?
Common warning signs include cracking, crumbling foam, powdery residue, brittle soles, flaking interiors, and material separation. However, white leather residue alone does not prove dry rot.
2. How to check for dry rot in used shoes bought online?
Ask for close-up photos of the sole edges, midsole, flex points, interior, and glue lines. Request that the seller gently flex and press the soles before shipping.
3. Can shoes have dry rot even if they were never worn?
Yes. Some synthetic components continue aging in storage. Heat, humidity, polymer chemistry, and time can weaken materials even when footwear remains unused.
4. Is sole separation always a sign of dry rot?
No. Separation may simply result from aged adhesive. If the sole remains flexible and solid rather than cracking or crumbling, professional regluing may be possible.
My Final Check Before Buying
The most dangerous used shoe is not necessarily the pair with visible wear. It is the pristine-looking pair whose materials can no longer survive movement.
I would rather buy leather shoes with honest scuffs and a solid structure than unworn vintage footwear with a midsole that turns to powder when flexed. Before paying, inspect every layer, gently stress the shoe where walking would stress it, and separate repairable glue failure from true material breakdown.
A thirty-second flex, press, and interior inspection can tell you more about an old pair than a dozen polished listing photos. If the structure fails the test, leave the bargain behind.